
WP SmartPay Pro integrates with the Model Context Protocol (MCP) — an open standard that lets AI assistants like Claude read and act on your payment data. Once connected, you can ask questions in plain English: "Show me this week's payments over $100", "Create a 20% off coupon expiring July 31", or "Cancel subscription #42".
How It Works
SmartPay Pro registers 15 AI abilities using the WordPress Abilities API. A separate plugin — the MCP Adapter — exposes those abilities to AI clients over an HTTP endpoint. Authentication uses a standard WordPress Application Password, so no extra API keys or tokens are needed.
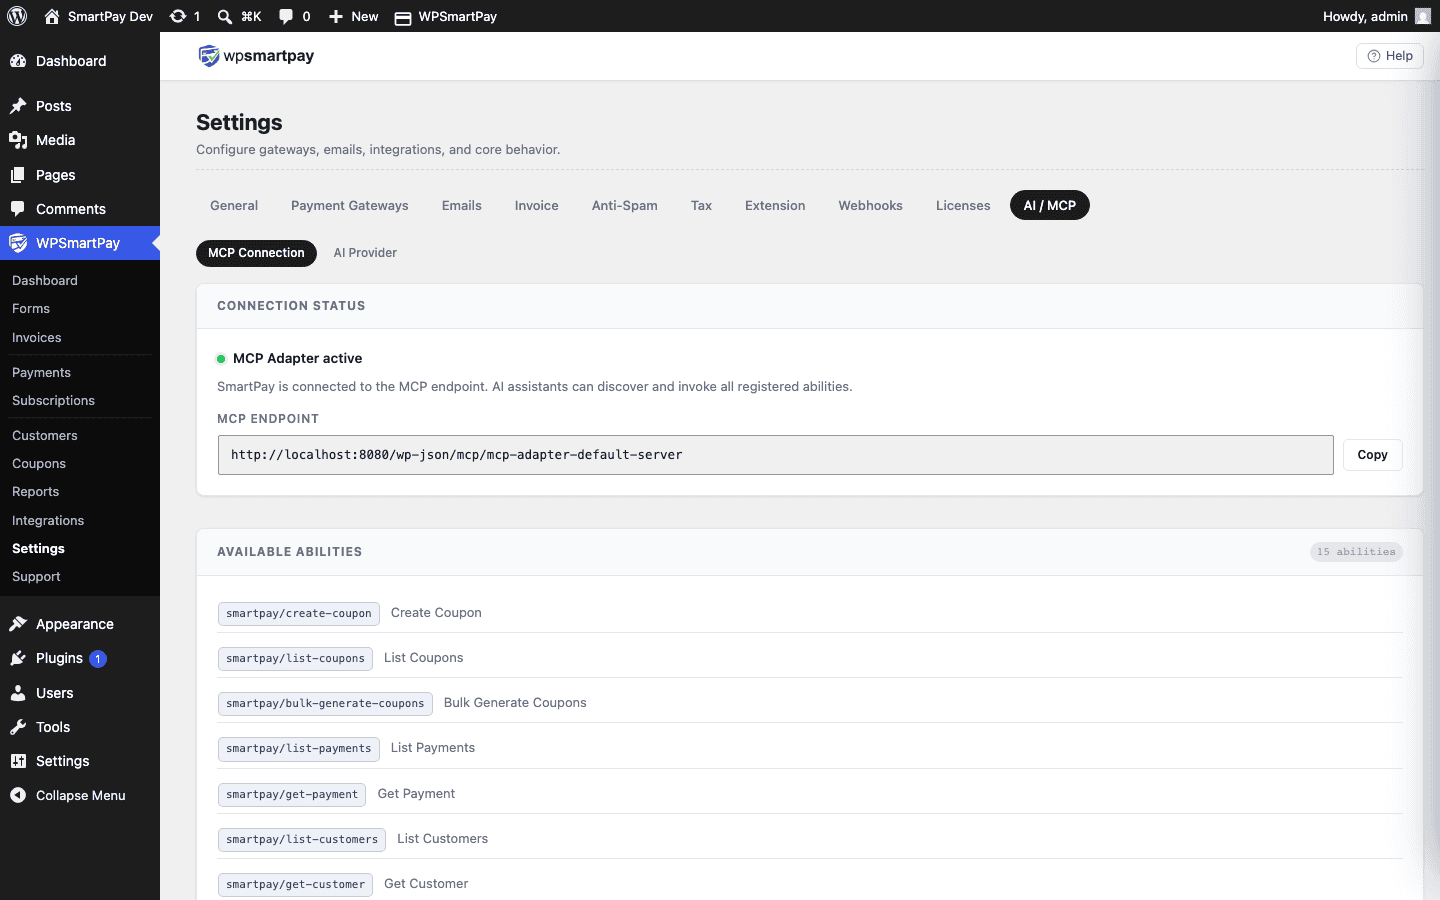
Step 1 — Install the MCP Adapter
Go to SmartPay → Settings → AI / MCP. If the MCP Adapter is not yet installed, the Connection Status card shows a red dot and an Install MCP Adapter button.
Click Install MCP Adapter. SmartPay downloads and activates the plugin automatically.
The page reloads. The status dot turns green — MCP Adapter active — and the endpoint URL appears.
Manual install: If the one-click installer fails, download the plugin from GitHub, then go to Plugins → Add New → Upload Plugin and upload the .zip.
Step 2 — Create an Application Password
The MCP endpoint uses a WordPress Application Password for authentication — no separate API token required.
Go to Users → Profile (or Users → All Users → click your admin account).
Scroll to the Application Passwords section.
Enter a name (e.g.
Claude MCP) and click Add New Application Password.Copy the generated password — it is shown only once.
Note: Application Passwords require HTTPS on your site. If your site runs on HTTP, Application Passwords are disabled by WordPress.
Step 3 — Connect Your AI Client
Copy the MCP Endpoint URL from the Connection Status card. It looks like:
https://yoursite.com/wp-json/mcp/mcp-adapter-default-serverClaude Code (terminal)
Run the one-liner shown on the settings page. Replace the URL with your endpoint, then enter your WordPress username and Application Password when prompted for authentication:
claude mcp add smartpay --transport http "https://yoursite.com/wp-json/mcp/mcp-adapter-default-server"Claude Code stores the server and it is available in every project on that machine.
Claude Desktop
Open Claude Desktop and go to Settings → Developer → Edit Config. This opens
claude_desktop_config.jsonin your editor.Copy the config snippet from the settings page and paste it into the file:
{
  "mcpServers": {
    "smartpay": {
      "url": "https://yoursite.com/wp-json/mcp/mcp-adapter-default-server",
      "type": "streamable-http"
    }
  }
}
Add your WordPress Application Password as a bearer token in the
headersfield, or enter it when Claude Desktop prompts for credentials.Save the file and restart Claude Desktop.
Available Abilities
SmartPay registers 15 abilities that your AI assistant can call. All abilities are read-only except where noted.
Ability | What it does |
|---|---|
| List payments with filters (status, gateway, search by email/name) |
| Get full details of a single payment by ID |
| List customers with optional search |
| Get a customer profile and their recent payments |
| List subscriptions with status filter |
| Cancel an active subscription (write) |
| List invoices with status filter |
| Create a draft invoice for a customer (write) |
| Send a draft invoice to the customer by email (write) |
| List coupons with usage data |
| Create a single coupon code (write) |
| Generate multiple unique coupon codes at once (write) |
| List all payment forms |
| Get a single form by ID |
| Create a new payment form with pricing options (write) |
Example Prompts
Once connected, try these in Claude:
"Show me all failed payments this month."
"Who are my top 5 customers by total amount paid?"
"Create a 20% off coupon called SUMMER2026 with no expiry."
"List all active subscriptions."
"Cancel subscription ID 42."
"Create a draft invoice for [email protected] for $299."
"List all payment forms and their IDs."
Security
The MCP endpoint is protected by your WordPress Application Password — the same credential system WordPress uses for its REST API. Keep it secure:
Use a dedicated Application Password for MCP (not your login password).
If a password is compromised, revoke it from your user profile — only that password is affected.
Write abilities (create coupon, cancel subscription, etc.) require the same admin permissions as doing those actions in the WordPress dashboard.
The endpoint only works over HTTPS — plain HTTP requests are rejected by WordPress.
Troubleshooting
Status dot stays red after install
Hard-reload the settings page (Ctrl+Shift+R / Cmd+Shift+R). If the dot is still red, go to Plugins and confirm that MCP Adapter is listed and active.
AI client shows "Unauthorized"
Your Application Password may be wrong or the user may lack the manage_options capability. Regenerate the password, and make sure you are using an Administrator-level account.
Abilities not appearing in Claude
Restart the AI client after adding the MCP server. In Claude Desktop, a full quit-and-reopen is required. In Claude Code, run claude mcp list to confirm the server is registered.
HTTPS required
WordPress Application Passwords are disabled on sites without HTTPS. Install an SSL certificate and ensure your site URL in Settings → General starts with https://.