If you are a creator or running an eLearning platform and looking for a trusted payment gateway system except for Stripe and Paypal, we have a solution. Selling online is the future. If you want to sell your course online through an LMS, then Paddle may be the best solution for you. For your Paddle payment needs, you’ll need a useful WordPress plugin, and here, Paddle for WooCommerce Plugin allows you to integrate Paddle payment gateway with the Tutor LMS.
In this blog, we will show you how to integrate a Paddle Payment Plugin with the trending Tutor LMS; in short Paddle for Tutor LMS. The formulas are pretty straightforward and easy to understand. Just, Stay with me.
Why Use Paddle Payment?

Paddle is one of the most secure billing and payment gateway solutions for businesses that want to focus on selling their digital products online. If you don’t want to lose your hair dealing with taxes, payment gateways, the website itself, and break the bank on accounting costs, then Paddle is for you.
What are the extensive features of Paddle? Let’s see,
- Powerful payment options: You can easily manage your entire customer billing process with Paddle’s powerful payment option for WordPress. Paddle itself handles all the payments, taxes, currencies, compliance, and billing support queries.
- Protect against fraudulent chargebacks: Paddle combines their algorithms with fraud prevention by maintaining four layers of fraud protection, and this ensures the suspicious flag transactions and helps you fight chargebacks.
- No complicated sales taxes: Paddle pays your sales tax on your behalf, then issues a ‘reverse invoice’ to show your records as payable and ensures tax compliance across your payments, subscriptions, invoices, and receipts.
- Beautiful & seamless checkout: Your customers don’t have to leave the site at all to complete the purchase because Paddle takes payments by credit card or any billing cycle seat-based or usage-based through its flexible checkout.
- No dealing with invoices: Paddle easily drafts and sends invoices to your customers through its invoicing, which has also been integrated and reconciled with your subscription payments.
- Accept all your payment methods: Take payments through credit card, wire transfer, and alternative payment methods because Paddle accepts a wide range of global payment methods (including PayPal) in one integration.
- One-time payments: Paddle hosts all your payment methods in one platform and reconciles payments on your behalf to each customer account, and subscription also ensures single time payment.
- All your Taxes and VAT calculated and filed: You don’t have to worry about your Taxes and VAT calculation because Paddle automatically handles the calculation, collection, and remittance of sales taxes and VAT in every single country on your behalf.
- Allow 3rd party affiliate network: Paddle doesn’t create a problem in using 3rd part affiliate network. However other payment gateways may create complications if you want to apply to a 3rd party affiliate network.
Why Tutor LMS?

Tutor LMS is an all-in-one learning management system for individual instructors, educational institutes, and eLearning platforms. It is a complete extensive feature-packed WordPress LMS plugin as of now. To create & sell courses online, take quizzes, add multiple instructors, and create interactive lessons easily, Tutor is undoubtedly the best option to choose.
Let’s see the best features provided by Tutor LMS,
- Built for instructor and coach: With unlimited customization options and a user-friendly interface, Tutor LMS comes with a revolutionary drag & drop system specially built for instructor and coach to create resourceful courses.
- Advanced quiz creator: The rich quiz creation options in this WordPress LMS plugin allows you to select question patterns, set time limits, and many more related topics.
- Frontend course builder: The Frontend course builder is considered to be the first-ever WordPress Frontend Course Builder. You can create quizzes, add multiple instructors & get all the backend options right on the frontend easily.
- Easy eLearning management: You can manage your eLearning platform with Tutor LMS without any complication because it helps you stay in charge of your courses.
- Reports & analytics: Tutor provides comprehensive information and analytical stats analyzing your course performance, which is generated automatically.
- Earning & commission allocation: You can distribute commission, set commission percentage, deduct fees, and manage the entire process because earning & commission allocation options are built inside Tutor LMS.
Is Tutor LMS free?
Tutor LMS comes in both a free and premium version, however, the free version comes with some generous basics you’ll need to run courses. You will get access of,
- The course builder, along with unlimited lessons and courses.
- Video player support.
- Most of the quiz functionality, including the ability to limit quiz attempts, set a passing grade, and add a time expiration.
- Monetization via WooCommerce or Easy Digital Downloads.
How to Use Paddle with Tutor LMS

To Integrate Paddle for Tutor LMS and accept payment with Paddle, we need to install Tutor LMS, WooCommerce, and Paddle for WooCommerce Plugin separately and then setup Paddle to connect your account. One thing should be noted that Tutor LMS gets payment directly through WooCommerce or EDD. However, it doesn’t allow the Paddle payment plugin for payment.
Here we bring the solution for integrating the Paddle Payment Plugin with Tutor LMS. We will use the #1 Paddle payment gateway plugin for WordPress, Paddle, for WooCommerce Plugin. You can easily sell your digital products with Paddle and accept one-time and recurring payments easily. Just connect the Paddle for WooCommerce Plugin with Paddle, and you are done.
Let’s see the process below,
- Install Tutor LMS
- Install WooCommerce
- Install Paddle for WooCommerce Plugin
- Paddle Setup to Connect Your Account
- Integrate Paddle Payment Plugin with Tutor LMS
How to Install Tutor LMS
The installation process of the Tutor LMS is the same as all the other WordPress plugins. For a further guideline follow the following documentation or choose any of the following methods.
Installing the Free Version
- Go to your WordPress site Dashboard
- Navigate to Plugins > Add New and type in “Tutor LMS” in the search field
- Find Tutor LMS from the list and hit “Install Now“
- After successful installation, activate the plugin to create a full-fledged online learning platform.
Installing WooCommerce
WooCommerce is one of the most popular open-source eCommerce WordPress plugins that allow you to build and run an online store using the most powerful CMS, WordPress. Because of the open-source platform, you can build and customize your online store very easily.
The core WooCommerce plugin can be installed same as other WordPress plugins. Full installation and configuration of WooCommerce on your site is an additional and optional step to help with full setup, this is available in the Setup wizard.
To know more about WooCommerce installation please follow the following documentation or follow the below methods.
Installation via WordPress Admin
If you have an existing site and want to install WooCommerce, using the WordPress Admin is the most straightforward option as it handles everything for you. To do so,
- Go to Plugins > Add New.
- Search for “WooCommerce”.
- Click “Install Now”.
- Click Activate Now and you’re ready for the WooCommerce Setup Wizard.
WooCommerce Setup Wizard
When WooCommerce is activated for the first time, the WooCommerce Setup Wizard will be the next screen you see after clicking “Activate”.
This helps you set up and configure your site with WooCommerce functionality.
For a full walkthrough of the Setup Wizard, please read through the WooCommerce Setup Wizard documentation.
Installing Paddle for WooCommerce Plugin
Paddle for WooCommerce Plugin is a standalone plugin to sell your digital products with Paddle that needs to be purchased and installed separately. The easiest way to install Paddle for WordPress Plugins is to upload the plugin through your WordPress admin area. But we’ll cover how to manually install it via FTP upload as well.
Before you install, let’s review the system requirements for the plugin. You’ll also need to make sure you have WooCommerce installed and activated.
Direct Upload
First, you’ll need to download the Paddle for WooCommerce Plugin zip file from your purchase email receipt or from your account.
If you see the email receipt for your purchase, just click the included download link.

Now, click the download link from your account purchase receipt section.
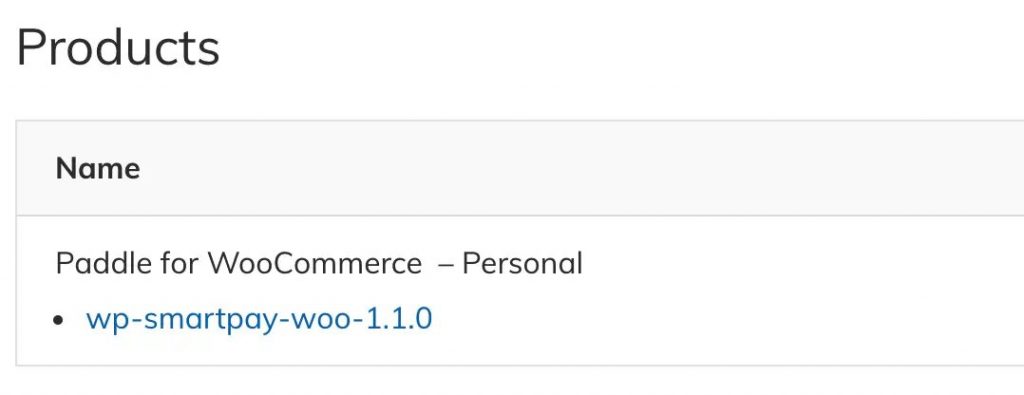
Clicking the download link will initiate a .zip file of the plugin to your computer. Once you saved the plugin zip file to your computer, log in to the WordPress admin of the site that you want to install the plugin on.
- Within the admin, go to Plugins > Add New.
- Then click Upload Plugin.
- On the next screen, you should see a Choose File button.
- Click this and select the Paddle for WooCommerce Plugin zip file, then click Install Now.
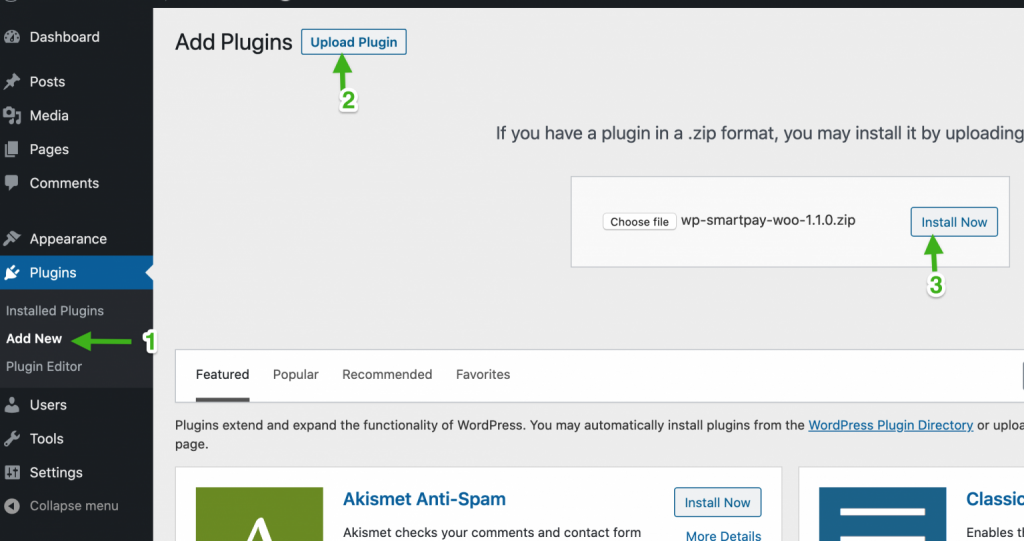
After successful installation, WordPress should ask you to Activate Plugin. Click that blue button and continue.
Configuring Paddle Payment Gateway
Connecting Paddle gateway with WooCommerce is pretty simple and straightforward with Paddle for WooCommerce Plugin. Make sure you have installed Paddle for WooCommerce Plugin and activated your license.
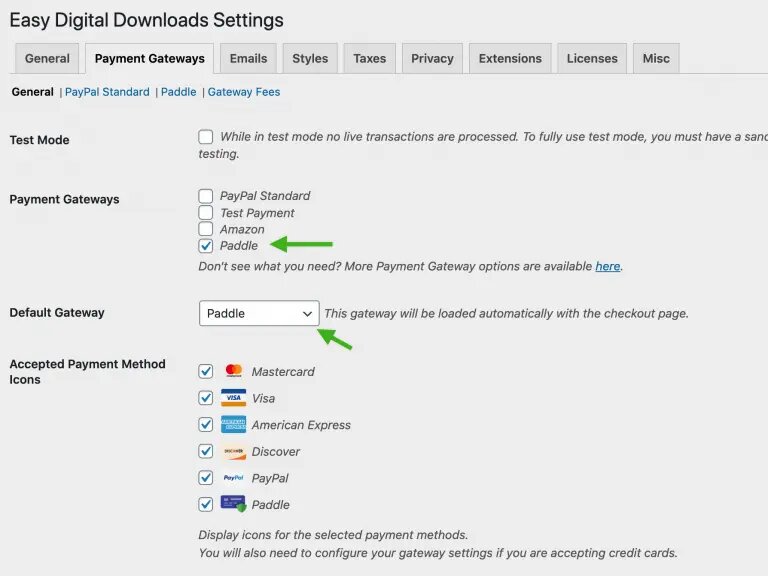
In your WordPress admin, go to Downloads > Settings > Payment Gateways. Check Paddle from the Payment Gateways options and select it as a default payment gateway.
Paddle Connection Setup
Click the Paddle menu under the Payment Gateways tab. To connect your Paddle account you need; Vendor ID, Auth Key, Public Key and Instant Notification System (INS)
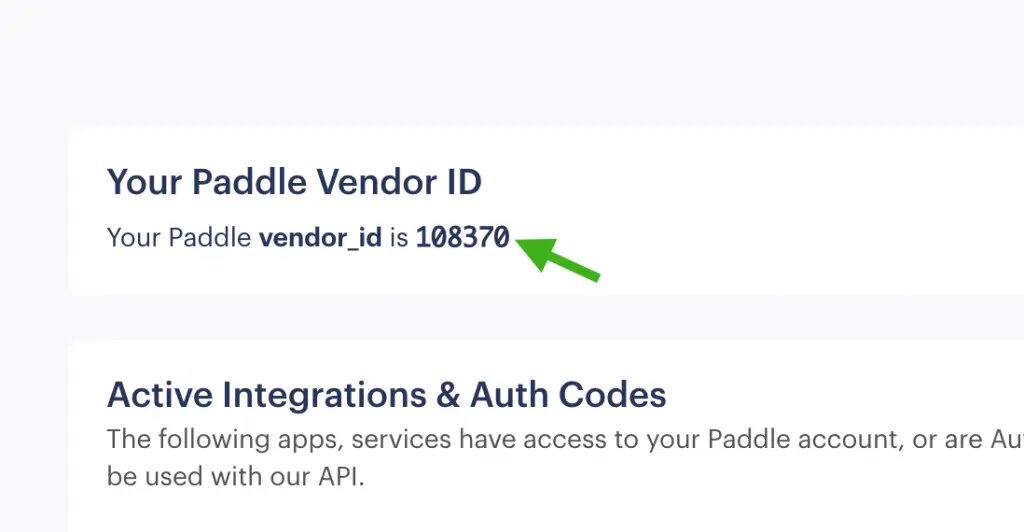
Vendor ID
Login to your Paddle dashboard and go to Developer Tools > Authentication. Copy your numeric vendor ID from the Paddle vendor ID section and apply it to the plugin’s Vendor ID field.
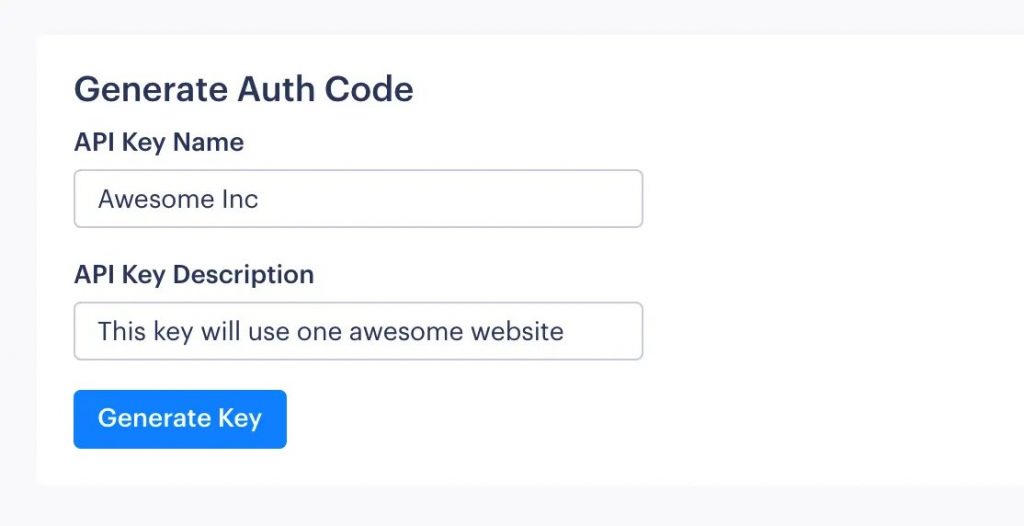
Auth Key
Scroll down to the Generate Auth Code section and generate a new auth key for your website.
Note: We DO NOT recommend to use the default auth key. For security reasons always generate new keys for new websites.
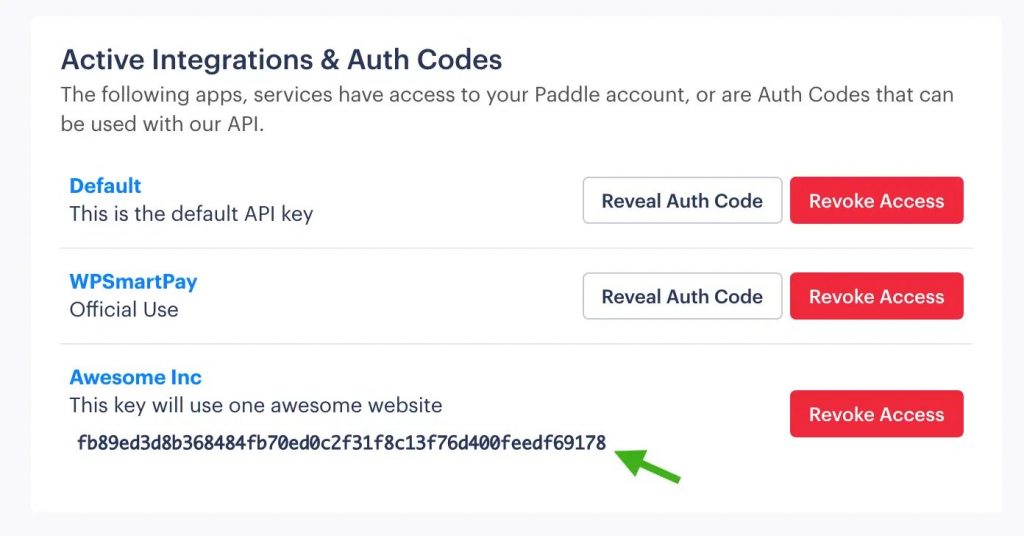
On your active auth key section click the Reveal Auth Key button and copy the auth key and apply on plugin’s Auth key field.
Public Key
Go to Developer Tools ? Public Key page and copy the public key from that page and apply to plugin’s Public Key field.
You must copy the complete Public Key including the —–BEGIN PUBLIC KEY—– and —–END PUBLIC KEY—– line.
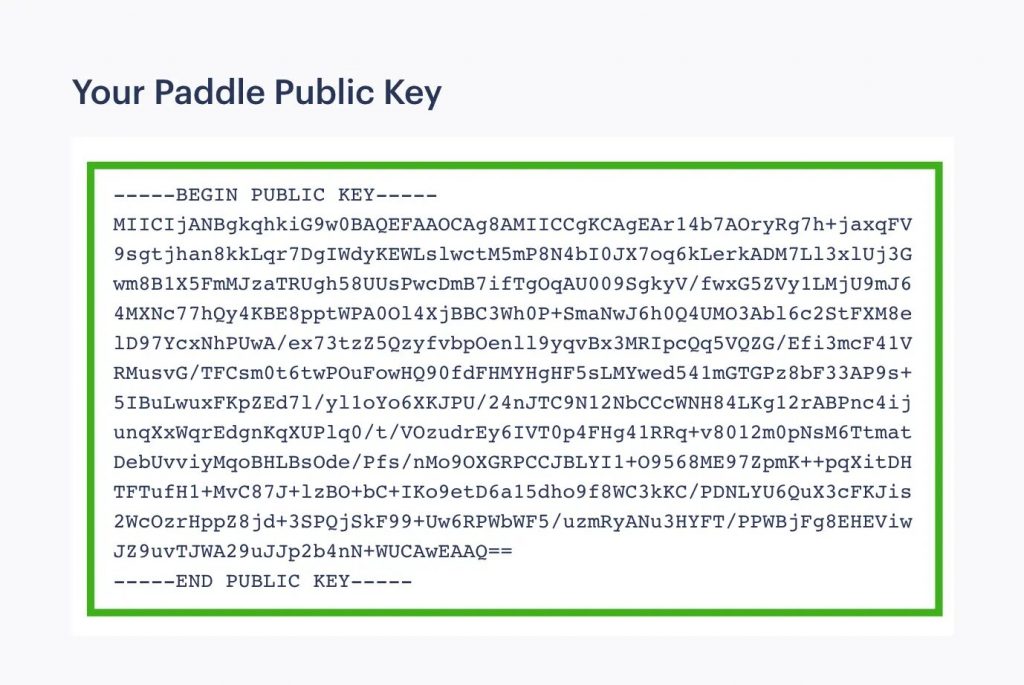
After applying all these fields click the Check Credentials button and if everything goes well, you’ll see a Verified message.
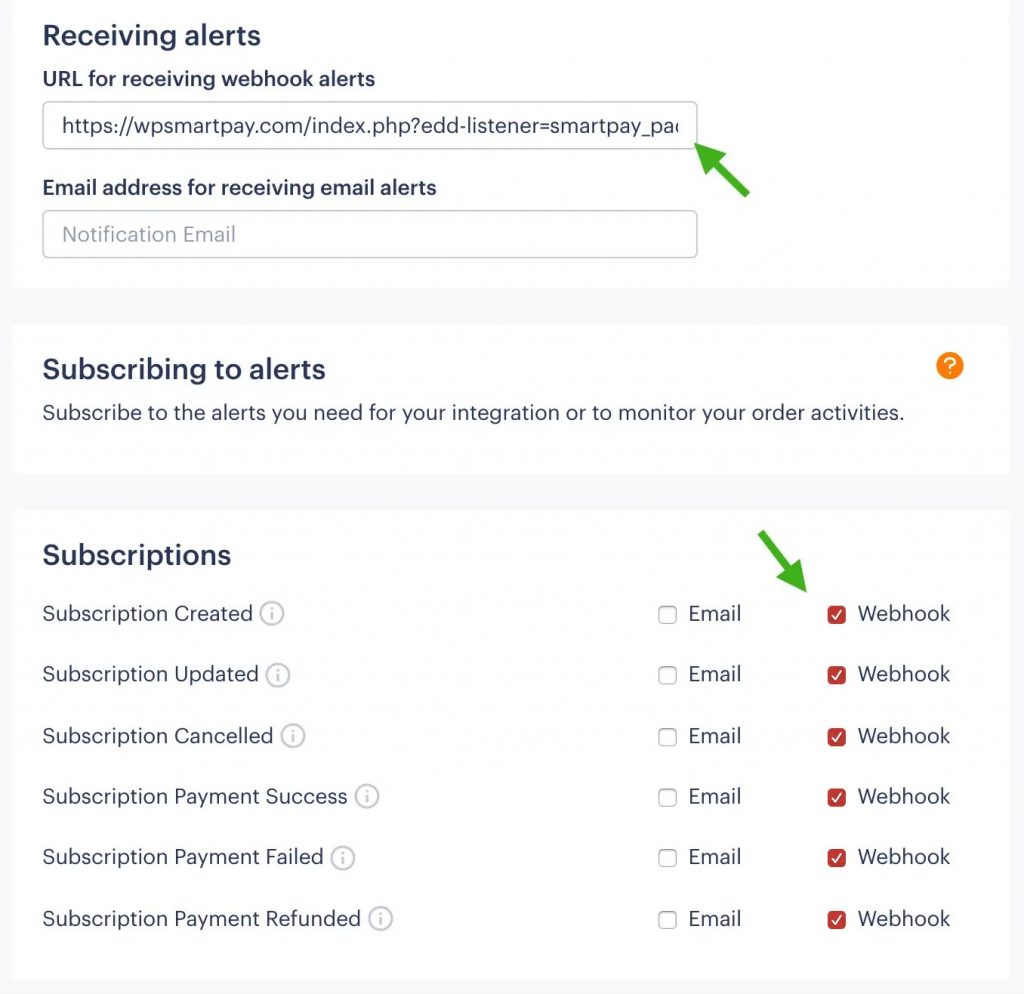
Instant Notification System (INS)
Copy INS URL from the plugin and go to Paddle > Developer Tools > Alerts / Webhooks page. Apply the INS URL to the URL for receiving the webhook alerts input box. Scroll down and check all the webhooks checkbox under Subscriptions, One-off purchases, and Risk & disputes section.
Understanding Plugins Fields
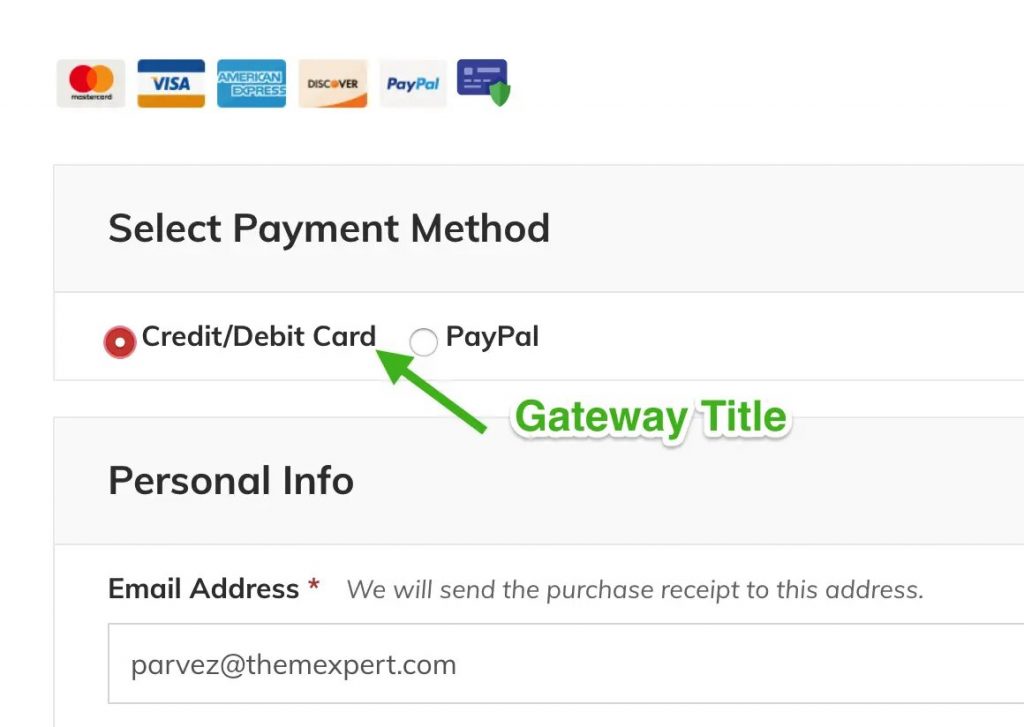
Gateway Title: If you use multiple payment gateways with Paddle this gateway title field will help your customer identify the gateway. Here we’ve used a Credit/Debit card as a gateway title.
Checkout Image URL: Select a default checkout image for popup payment form . If your product image is missing this image will be used. This could be your logo or store icon.
Checkout Location: Paddle for WooCommerce Plugin supports two checkout types.
- Popup: On site overlay based checkout system where your customer stays on the site and completes the checkout process.
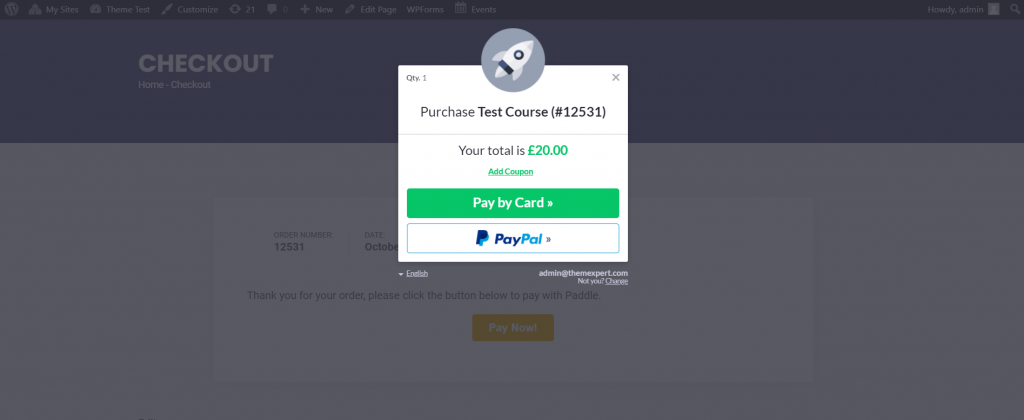
- Paddle Checkout: Take your customer to Paddle website and after the checkout process take back to your site. Paddle is 100% compliant to Strong Customer Authentication and 3DS2.
Integrate Paddle Payment Plugin with Tutor LMS
Now, we have installed Tuor LMS, WooCommerce, Paddle for WooCommerce Plugin, and connected Paddle with the account. It’s time to integrate Integrate Paddle Payment Plugin with Tutor LMS. Let’s see how to do so,
To sell products through WooCommerce first, we need to enable WooCommerce from the setting option of Tutor LMS. Follow the process below,
- From the WordPress, Dashboard navigate to Tutor LMS > Setting
- Navigate to Monetization and then enable WooCommerce from there.
- Finally, Save the settings.
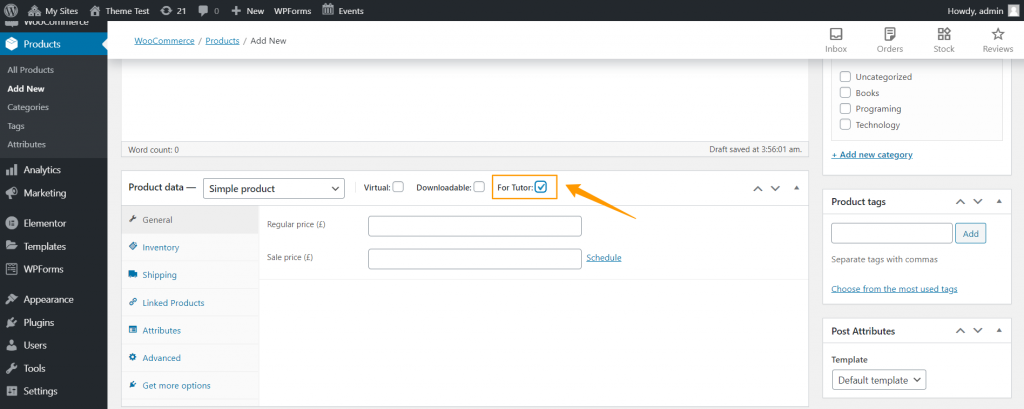
Here, we will define a WooCommerce product with the price. Follow the process below,
- From the WordPress, Dashboard navigate to Product
- Select a product if there is any.
- If there is no Product available then add a new course by clicking the Add New button.
- Put the product name, description, and must define the course price there.
- Search for the “For Tutor” option and enable it.
Now, we have to link the WooCommerce product to the course from Tutor LMS. Follow the process below,
- Navigate to Tutor LMS > Courses
- Select the course we have already created and then click the Edit button.
- Course page setting will appear now, navigate to Add Product > Course type > enable Paid.
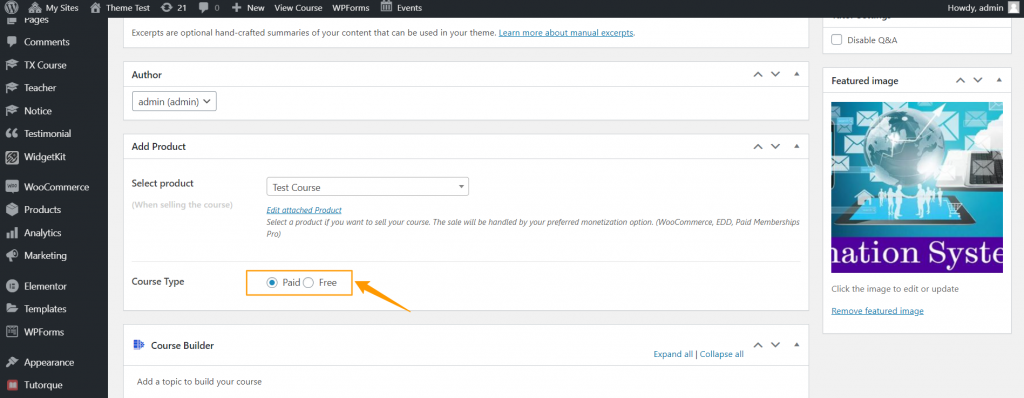
- Click Update Button
Now, the WooCommerce product has been linked with the course from Tutor LMS.
Let’s see how to add to cart the course and make payment using paddle payment gateway with the help of Paddle for WooCommerce plugin.
- Navigate to the course page and click the Add to Cart button from the right side.
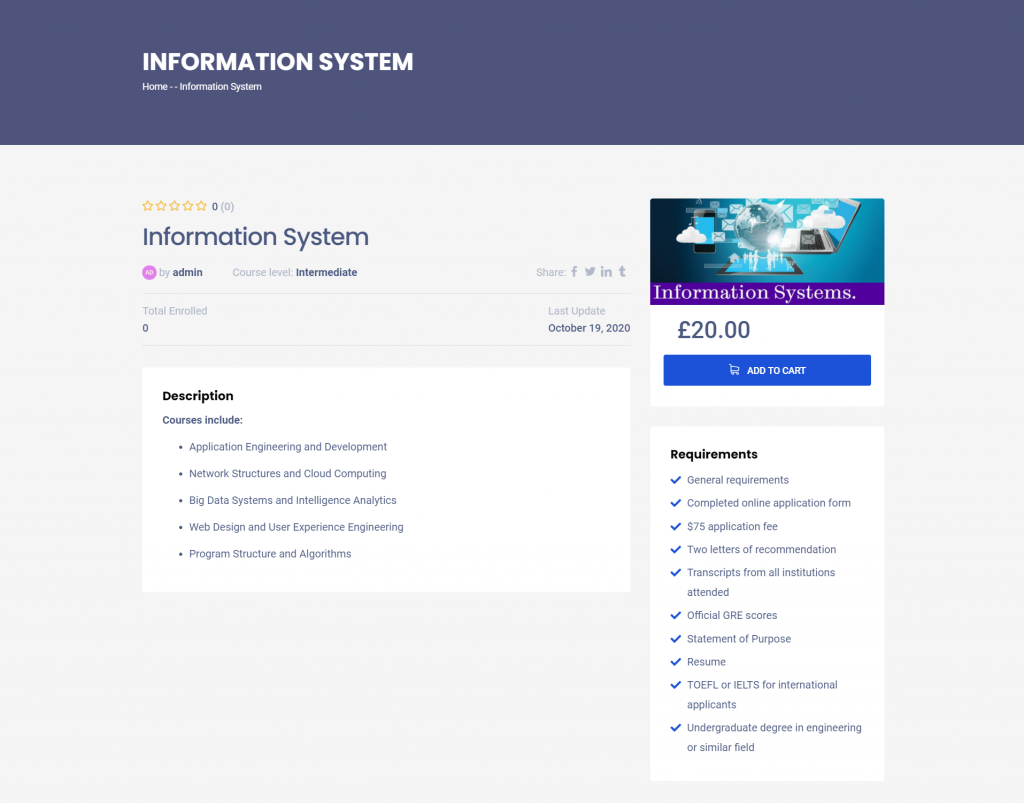
- Your desired course will add to your cart and you can see it from the Cart page.
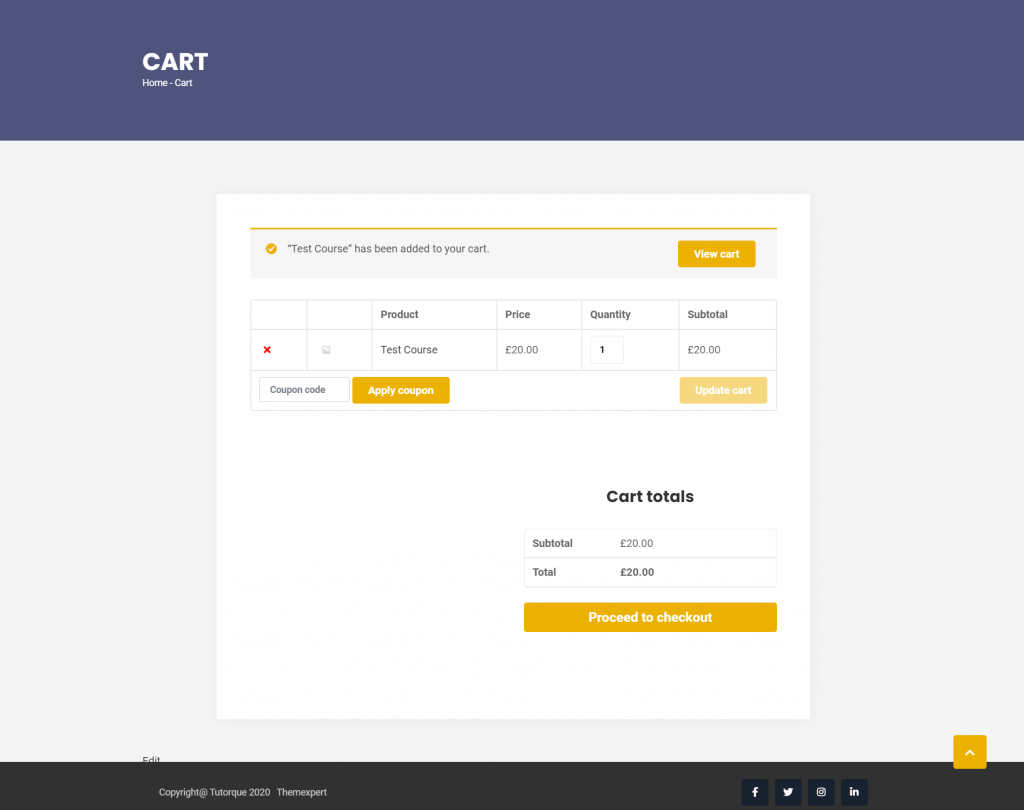
- Now click the Proceed to the checkout button
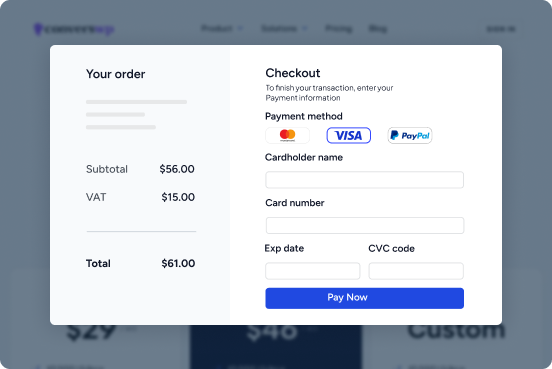
- A user information form will appear with your order history. Fill the form and click the Place order button.
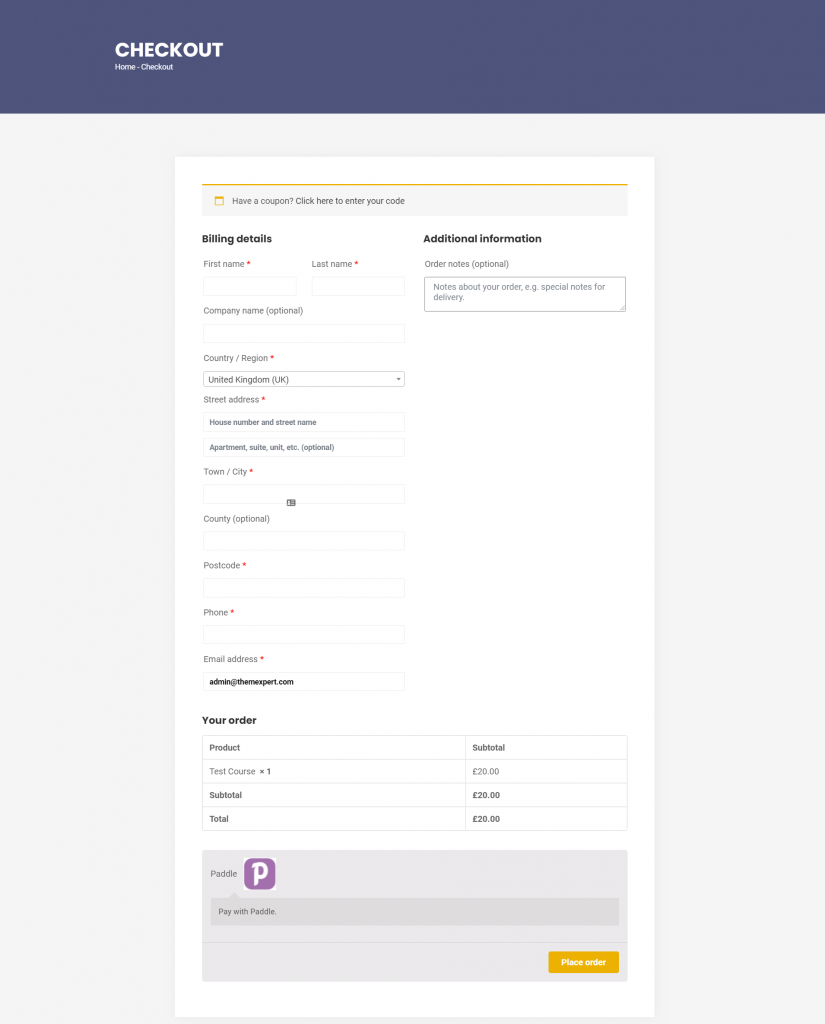
- An order confirmation page will appear with a Pay Now button.
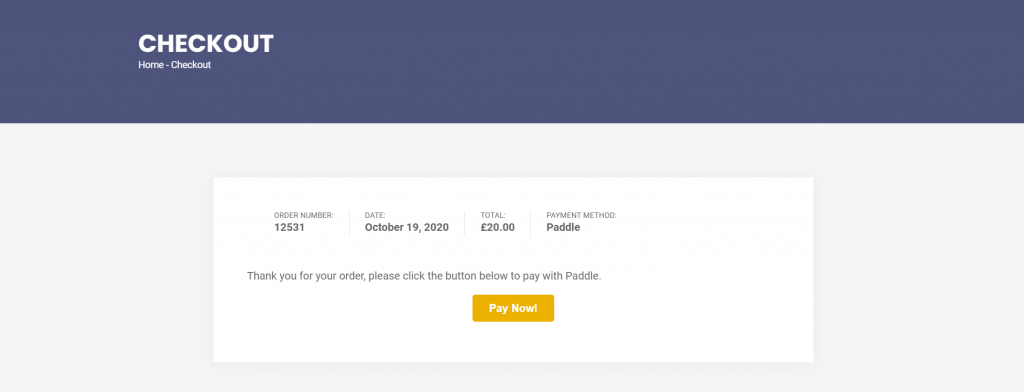
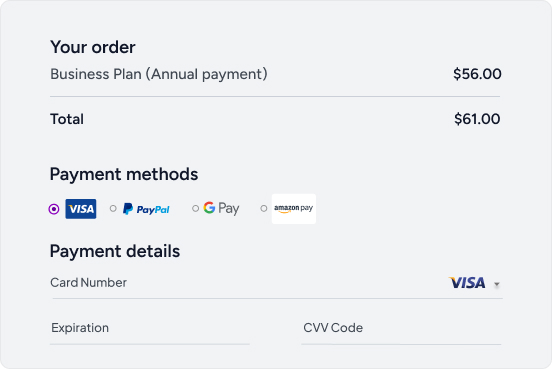
- Give your location and your desired payment option with the necessary details.
After successful payment a page will appear with a payment success message. That’s it.
Best Theme for Tutor LMS
Tutorque is the most lightweight, fast, and accessible WordPress LMS theme extensively integrates with Tutor LMS out of the box. It’s not just a theme; it’s an all-in-one Education WordPress Theme for creators, online courses, learning platforms, and educational institutes with limitless functionalities and online selling options. With the power of Elementor and WidgetKit, you can build exactly what you need extensively with the Education WordPress Theme.
What does Tutorque LMS WordPress Theme offers? Let’s see,
- Support best WordPress LMS plugins: Tutor LMS & LeanrDash + more coming: Tutorque is integrated with the most popular WordPress LMS plugin LearnDash and Tutor. However, more integration is on the way to amaze you.
- Accessibility: The education WordPress theme is entirely built with the strict accessibility guideline provided by wordpress.org for people with disabilities. Just with the tab button, anyone can access the full site directly from the theme layout.
- Elementor: You can Build a complete Education landing page with the most advanced WordPress website builder Elementor and the power of WidgetKit’s built-in 30+ elements.
- BuddyPress: With the combination of the most flexible online community-based software BuddyPress, Tutorque provides exactly what you need for a group discussion or social activity.
- bbPress: Maintain your discussion forums with the power of Tutorque and the streamlined discussion board of bbPress and quickly set up a place for asynchronous discussion
- Dashboard: Create social network profiles featured with recent activity, profile information, and let the members organize themselves into Extensible user groups with different activity feeds and member listings.
- WooCommerce ready: Sell anything to your student from books, ebooks to helpful products with the integration of WooCommerce for WordPress. Turorque is entirely WooCommerce ready to sell physical to digital products on your site without any somatic involvement.
- Multilingual support: Tutorque is entirely multilingual supported, therefore, make your education website multilingual and open up new possibilities for the native-speaking students with Tutorque.
- One-click data import: Import any of our pre-designed landing page demos just in a click with the powerful one-click demo importer. Ex: WordPress School Theme demo, WordPress Education Theme demo, University WordPress Theme demo, LMS WordPress Theme demo, etc.
Wrapping Up
You don’t need to be global, but your product should be. Let your clients buy your products through whatever the currency is and whichever payment methods they want to, using the Paddle for WooCommerce Plugin.
This was all to Integrate Paddle for Tutor LMS with the support of the Paddle for WooCommerce Plugin. I hope this blog will help you to get and pay payment through Paddle for any kind of Tutor LMS course. Don’t forget to share your valuable thoughts regarding this blog in the comment section below.